For unvented attics, air seal and insulate above the roof deck with rigid foam, or insulate and air seal on the underside of the roof deck with air and vapor impermeable closed-cell spray foam.
- In very cold and high snow load regions (ground snow > 60 lb/ft2) provide a ventilating air gap above the roof deck and any insulation over the roof deck.
See the Compliance Tab for related codes and standards requirements, and criteria to meet national programs such as DOE’s Zero Energy Ready Home program, ENERGY STAR Single-Family New Homes, and Indoor airPLUS.
Description
Description
What Ice Dams Are and How They Form
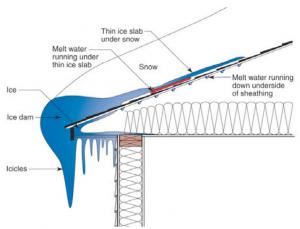
Ice dams occur if snow is present on a roof and the roof deck under that snow reaches above freezing temperatures. Usually, escaping heat from the home is the source of the warming temperatures that cause the snow layer in contact with the roof deck to melt. Melt water then runs down the slope of the roof until it reaches the roof eave where the roof deck is cold enough for it to refreeze (Figure 1). Ice dams can also form in valleys, around chimneys, or other areas where snow is present and the roof deck is warmer. As this cycle of melting, runoff, and refreezing progresses, the ice formations will build up and form a “dam.” This dam then causes the meltwater to collect and back up under the roofing, causing roof leaks and damage to the structure. Falling ice and dripping water can cause harm to equipment and occupants below.
 Ice dams form when warmth from the attic causes snow on the roof to melt and flow to the roof eaves where it refreezes at the colder overhang and forms a buildup of ice that causes additional snowmelt to puddle where it can wick back through shingles and leak into the atti" />
Where Ice Dams Occur and Why
From a climate perspective, the two elements needed to produce ice dams are:
- outdoor temperatures below freezing
- snow accumulation which stays on the roof.
When combined, heavier snowfall and colder temperatures tend to produce more severe ice dams. Sustained seasonal freezing temperatures with lasting snowfall on roofs are most prevalent in U.S. climate zones 5 and greater; however, the 2018 IRC and IBC codes do not specify regions in the country where ice dams occur. Instead, both codes reference historical precedent. If a region is known to have a history of ice damming then builders should plan accordingly to mitigate by using local building departments as a resource to determine ice dam prevalence and construction methods.
Ice dams are typically prevalent where the ground snow load is greater than 60 lb/ft2. They are likely anywhere the ground snow load exceeds 30 lb/ft2 (Lstiburek 2011). The insulating value of snow encourages ice dam formation. Snow has an approximate insulating value of between R-1 and R-2 per inch. This means every added inch of snow further insulates the roof deck a little more until eventually the thaw-vulnerable warmer areas of the roof deck begin to rise above freezing temperatures, leading to snow melt.
Roof Designs and Ice Dam Formation
Most roof designs can be constructed to minimize ice dam formation but some roof designs are more foolproof than others and, in general, simpler is better. Roofs with many intersecting levels, valleys, dormers, and other projections or interruptions are more difficult to air seal, insulate, and ventilate, and a continuous air and thermal barrier and adequate ventilation of the roof deck are all critical to minimizing ice dam formation in cold climates (Lstiburek 2006, 2015, 2018, 2020, Straub 2006)
Unconditioned, Ventilated Attics
The simplest roof design in ice dam-prone areas is the vented, unconditioned attic (Lstiburek 2015). It could also be called the most energy efficient since the insulated surface area of the attic is limited to the flat area of the ceiling above the living space (Figure 2).
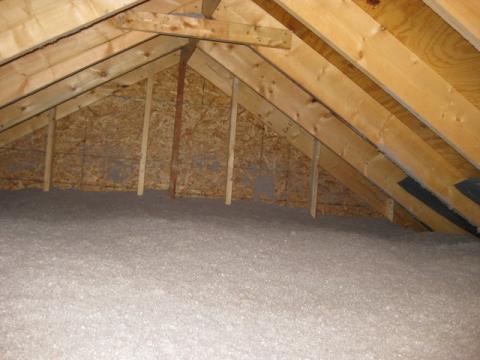
In order for an unconditioned, ventilated attic to perform well, the ceiling must be both very air tight and well insulated, and the attic must be well ventilated (Straube 2006). In climate zones 5 and greater, the recommended R-value for such roofs is R-60 or greater (Lstiburek 2018). (See 2021 IECC for insulation values.) In addition, localized heat sources in the attic must be eliminated. Any mechanical, electrical, or plumbing system capable of introducing heat into the attic represents a potential problem if escaping heat losses from that system elevate the attic temperatures. Since it is extremely difficult to insulate and seal air handling and heating systems to the point that heat losses do not have some effect on the attic temperature, it is best to keep mechanical systems out of the attic and locate them in conditioned space. If the HVAC equipment must be located in the attic, the air barrier and insulation layer should be moved above the HVAC equipment to the roof deck (Lstiburek 2011).
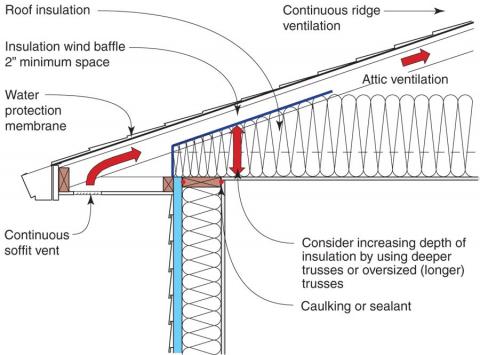
There are several other important considerations for constructing an effective unconditioned, and ventilated attic: Adequate insulation in the perimeter area where the roof extends over the exterior walls is critical. The roof deck above the top plate should be elevated enough to allow for the same amount of insulation as the rest of the attic floor. The roof trusses should be designed with raised heel energy trusses or alternatively over-sized standard trusses to accommodate the full height of attic insulation over the exterior wall top plates. At a minimum the insulation over the top plates should exceed the R-value of the exterior walls (Lstiburek 2018). In addition to adequate insulation, there should be enough room above the insulation at the exterior walls to provide for a minimum of 2 inches of ventilation space, even if code only requires 1 inch (Lstiburek 2011). Ventilation baffles and dams help ensure this space by keeping insulation out of the soffit vents and directing air flow from the soffits along the underside of the roof to the ridge vents.
Compact Roofs
There are several reasons why an unconditioned ventilated attic may not be desirable. Examples would be wanting to use some or all of the attic space as conditioned living space, building a cathedral ceiling for architectural reasons, or conditioning and using the attic space for mechanical systems. A “compact roof” refers to any roof where the attic is unvented and the insulation is installed along the slope of the roof, either below the roof deck, above the roof deck, or both above and below the roof deck. In all cases, however, the insulation is in contact with the roof deck and follows the slope of the roof. Any departure from an unconditioned, ventilated attic roof design will involve greater planning and execution efforts to ensure the roof deck stays cold. Any mistakes in air sealing, insulating, or condensation management are going to be less forgiving and harder to remediate. If combining permeable and impermeable insulations, and insulation above the roof deck with insulation below the roof deck, consult the code to avoid condensation in the roof assembly. Also see the guide Condensation Control in Attics and Roofs in Cold Weather. In general, in colder climates, with compact roof designs, more R value should be above the roof deck than below the roof deck to minimize the likelihood of condensation formation. Compact roofs that are unvented can be used where the ground snow load is less than 60 lbs/ft.2 If the ground snow load is higher than 60 lbs/ft2 the compact roof should be ventilated above the roof deck to decrease the chances of ice dam formation. The thermal resistance of the compact roof should be greater than R-60.
Vented, Compact Roofs
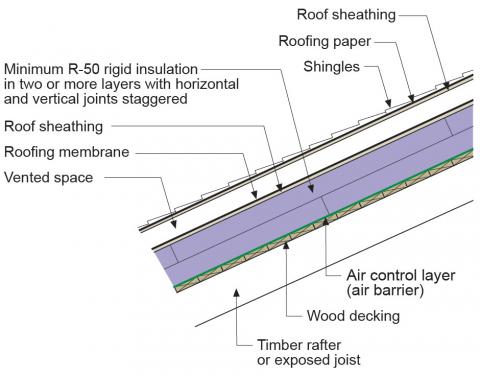
In cold climates where it snows a lot (ground snow load of 60 lb/ft2 or more), the compact roof should be constructed with a “vented over-roof” over the top of the “unvented under-roof.” The roof may be insulated on the underside with spray foam, or above the decking with rigid foam that is installed over an air barrier of house wrap installed over the roof decking. The foam is topped with a layer of sheathing, roof underlayment or membrane, then a ventilation gap, which can be provided by two perpendicular layers of 1-inch battens. This is topped with another layer of roof sheathing and building paper and finally the roof cladding (Figure 4). Outdoor air enters at the eaves and exits out a continuously vented ridge in order to keep the roof deck as cool as the exterior temperature. Ventilation rates and ratios do not differ from unconditioned attic designs. Every single bay or channel requires a 2-inch vent space from the soffit vents to the ridge vents to ensure enough cold air is present to prevent heat losses through the roof deck from melting snow on the roof and to compensate for the thermal resistance of the roof snow cover.
Ventilation Guidelines for Vented Roof Systems
Whether a roof is built with an unconditioned vented attic or as a vented compact roof assembly, there are several guidelines to follow to ensure that the roof deck stays at or below freezing temperatures when the exterior temperature is below freezing temperatures:
- Vent Continuously: Every rafter or truss bay must be vented at the intake side. Use ridge vents to vent every bay at the peak.
- Maintain a 2-inch vent space: The IRC code through 2021 maintains that not less than a 1-inch space be provided between the insulation and the roof sheathing. Field testing and experience has determined however that the added air flow provided by a 2-inch unobstructed air space is more effective at preventing ice dams (Lstiburek 2018).
- Balanced ventilation: Do not vent the exhaust side more than the intake side. Per IRC 2018 R806.2, Not less than 40%and not more than 50%of the required ventilating area is provided by ventilators located in the upper portion of the attic or rafter space. The reason to favor the venting at the intake side is that this approach provides adequate air to meet the demands of the exhaust vents. If the exhaust vents are larger and move more air than the intake vents can provide, then additional heated air may be drawn into the roof from the leaks in the heated space to make up the demand.
- Vent at the fascia: Vents should be located closer to the outer edge of the soffits. Favoring the vents to the outer edge of the soffit reduces the chances of warm air being drawn into the vent. As the sun heats the siding, daytime air temperatures at the wall can warm well above freezing temperatures and a vent close to the wall is more likely to draw this heated air into the vent space.
- Avoid large overhangs: Large overhangs increase the chances of capturing air heated at the walls during the daytime being either drawn into the vent space or heating the overhangs from below. If large overhangs are desired, then a design-specific venting strategy must be provided by the builder before construction begins.
Air Tightness and Insulation
Minimal air leakage is critical to the prevention of ice dams. Keeping the ceiling plane air-tight controls moisture movement and air leakage associated heat transfer. Heat loss into the attic through air leakage that warms the roof deck is one of the greatest sources of ice dams in residential construction (Lstiburek 2018). See the guide “Attic Air Sealing, Insulating, and Ventilating for Ice Dam Prevention” for more information on attic air sealing and insulating
Roof Membranes
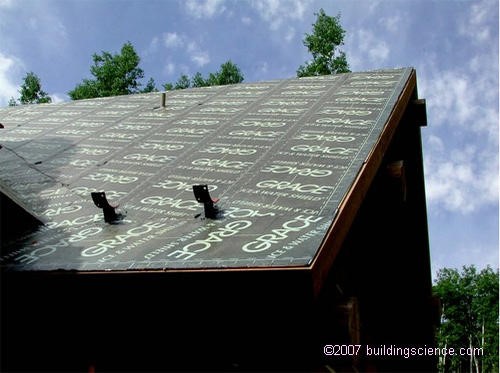
In residential construction, self-adhering roof protection membranes have become standard practice in ice-dam-prone regions (see compliance tab for current codes). Properly installed self-adhering membranes are a robust waterproofing-underlayment that provides excellent sealing around fastener penetrations and long-term protection against water infiltration. Self-adhering membranes are also preferable to polyethylene sheeting when the membrane is used as the first layer air barrier in both vented and unvented compact roof systems. In high snow regions, particularly with roofs that have complex framing involving hips, valleys, dormers, or chimney penetrations, good practice is to use self-adhering roofing membranes around all ice dam and water leakage prone areas. In areas known for severe ice dams and high snowfall, builders may opt to cover the entire roof with self-adhering membranes rather than risk water infiltration. (See Figure 5.) It is common to install fully adhered roofing underlayment under standing-seam metal roofs, in high wind areas, and over the rigid insulation on “vented over-roof” designs (see Figure 4). Note that, depending on conditions, a primer may be suggested or required by the membrane manufacturer to promote good, long-term adhesion. For instance, some types of oriented strand board may benefit from use of a coating of primer to ensure that the membrane is well-adhered and will function optimally. For more information see (Roof Eaves Sealed with Self-Adhering Membrane in Cold Climates)
Ensuring Success
The three best ways builders can combat ice dam formation are to

 Ice dams form when warmth from the attic causes roof snow to melt and flow to roof eaves where it refreezes at the colder overhang and forms a buildup of ice causing more snowmelt to puddle where it can wick back through shingles and leak into the attic" width="300" height="229" />